
Wiring a winch switch on an ATV might seem tricky. But, with the right guidance, it becomes simple and straightforward.
Having a winch on your ATV can be a lifesaver. Whether you’re stuck in mud or need to move heavy objects, a winch is essential. But to get it working, you need to wire the switch correctly. This guide will walk you through the steps.
We’ll cover the tools you need and the process in detail. By the end, you’ll have your winch ready to use. So, let’s dive in and make this task easy and manageable for you.

Credit: www.youtube.com
Tools And Materials Needed
Wiring a winch switch on an ATV can be a manageable task if you have the right tools and materials. Preparing everything beforehand will make the process smooth and efficient.
Essential Tools
- Wire strippers: These help you strip the insulation off your wires.
- Crimping tool: Essential for securing connectors to the wires.
- Screwdriver set: Needed for tightening screws.
- Electrical tape: Useful for insulating and protecting connections.
- Multimeter: Helps in checking voltage and continuity.
- Pliers: Handy for gripping and bending wires.
Required Materials
- Winch switch: The switch you are installing.
- Electrical wires: Used to connect the switch to the winch.
- Connectors: For joining wires securely.
- Heat shrink tubing: Protects and insulates wire connections.
- Battery terminals: Connects the wiring to the ATV battery.
Having these tools and materials ready will help you wire the winch switch efficiently. Make sure you have everything on hand before starting the installation.
Preparing The Atv
Before you start wiring your winch switch on an ATV, you need to prepare your ATV. This involves ensuring the ATV is positioned correctly and disconnecting the battery for safety. Following these steps carefully will help you avoid accidents and ensure a smooth installation process.
Positioning The Atv
First, make sure your ATV is on a flat, stable surface. This will prevent any unwanted movement during the wiring process. Use wheel chocks or bricks to keep the ATV in place.
Next, engage the parking brake. This adds an extra layer of stability. Make sure you have enough space around the ATV to work comfortably. Clear any obstacles or tools that might be in your way.
Disconnecting The Battery
For safety, always disconnect the battery before starting any electrical work. Locate the battery, usually found under the seat or in a compartment on the ATV. Use a wrench to remove the negative terminal first. This prevents any accidental short circuits.
Once the negative terminal is disconnected, proceed to remove the positive terminal. Keep the terminals separated from the battery to avoid any contact. You can use a plastic cap or cloth to cover the terminals.
After disconnecting the battery, wait a few minutes to ensure all electrical charges are dissipated. This step is crucial for your safety and to protect the ATV’s electrical system.
Mounting The Winch
Mounting a winch on your ATV is crucial for its proper function. It ensures that the winch stays securely in place and operates efficiently. Follow these steps to mount the winch correctly.
Choosing The Mounting Location
The first step is choosing the right location for mounting the winch. The front of the ATV is usually the best spot. This placement allows for better pulling power and visibility.
Consider these points when selecting the location:
- Ensure the area is flat and sturdy.
- Avoid obstructing any vital components of the ATV.
- Check that the location allows for easy access to the winch controls.
Proper placement ensures the winch performs optimally and lasts longer.
Securing The Winch
Once you have chosen the location, it’s time to secure the winch to your ATV. Follow these steps:
- Place the winch on the selected mounting spot.
- Align the mounting holes on the winch with those on the ATV frame.
- Insert bolts through the holes and tighten them securely.
Use a wrench to tighten the bolts properly. This prevents the winch from moving during use.
Double-check all bolts and connections to ensure the winch is firmly attached. A loose winch can cause damage or malfunction.
By following these steps, you ensure your winch is mounted securely and ready for action.
Credit: www.kfiproducts.com
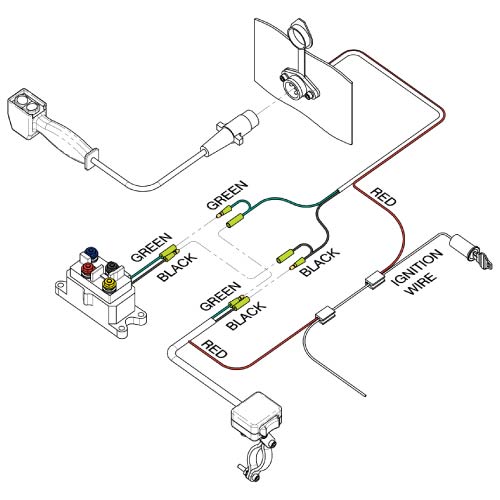
Installing The Winch Switch
Installing a winch switch on an ATV is essential for proper control. The process involves identifying the switch location and connecting the switch wires. This guide will walk you through each step, making the installation straightforward and effective.
Identifying The Switch Location
First, determine the best location for the switch. The switch should be easily accessible while riding. Most riders place it on the handlebars.
Avoid areas where the switch might get damaged. Consider the handlebar’s grip and the reach of your thumb. The switch should not obstruct other controls.
| Pros | Cons |
|---|---|
| Easy to reach | Potential for damage |
| Quick access | May obstruct other controls |
Connecting The Switch Wires
Next, connect the switch wires to the winch. Follow these steps for a secure connection:
- Locate the winch’s wiring harness.
- Identify the positive and negative wires.
- Connect the switch’s positive wire to the winch’s positive terminal.
- Connect the switch’s negative wire to the winch’s negative terminal.
Ensure all connections are tight and secure. Loose connections may cause the winch to malfunction.
Use zip ties to organize the wires. This prevents them from tangling or getting damaged.
Test the switch to ensure it operates the winch correctly. If the winch does not respond, check the connections again.
Installing a winch switch on an ATV enhances control and safety. Follow these steps for an effective installation.
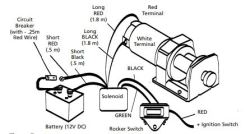
Wiring The Winch
Wiring a winch switch on an ATV can seem daunting. But with clear instructions, it becomes a straightforward process. This section will guide you through the steps of wiring the winch. We will cover running the wires and connecting to the power source.
Running The Wires
Start by identifying the path for the wires. The route should be safe and secure. Avoid areas where the wires could be pinched or damaged. Use zip ties to keep the wires in place.
Here is a simple method to run the wires:
- Locate the winch and the switch.
- Measure the distance between them.
- Cut the wire to the required length.
- Run the wire from the winch to the switch.
- Secure the wire with zip ties every few inches.
Make sure the wire is not too tight. There should be some slack to allow for movement. Check that the wire is not near any hot parts of the ATV. This will prevent overheating and damage.
Connecting To The Power Source
Now, connect the wires to the power source. Follow these steps:
- Identify the battery terminals.
- Connect the positive wire to the positive terminal.
- Connect the negative wire to the negative terminal.
- Ensure the connections are tight and secure.
Use a multimeter to check the connections. This ensures the current flows correctly. If the connections are loose, tighten them again. A loose connection can cause the winch to malfunction.
Finally, test the winch switch. Press the switch and observe the winch. It should move smoothly. If there are any issues, recheck the connections and wiring.
Here is a table summarizing the steps:
| Step | Action |
|---|---|
| 1 | Identify the path for the wires |
| 2 | Measure and cut the wire |
| 3 | Run the wire and secure with zip ties |
| 4 | Connect positive wire to the positive terminal |
| 5 | Connect negative wire to the negative terminal |
| 6 | Check connections with a multimeter |
| 7 | Test the winch switch |
Wiring the winch switch on an ATV is a manageable task. Follow these steps carefully. Your winch will be ready for action in no time.
Testing The Winch System
After wiring the winch switch on your ATV, it’s crucial to test the system. Proper testing ensures the winch operates correctly and safely. Follow these steps to test the winch system efficiently.
Reconnecting The Battery
First, reconnect the ATV battery. Ensure the terminals are clean and tightly connected. A secure connection is vital for the winch to function properly.
Next, check the battery voltage. A fully charged battery should read around 12.6 volts. If the voltage is lower, charge the battery before testing the winch.
Checking The Switch Operation
With the battery reconnected, it’s time to test the switch. Turn the ignition key to the “on” position. Press the winch switch to the “in” position and listen for the motor.
If the motor runs, the wiring is correct. Now, press the switch to the “out” position. Ensure the winch cable extends smoothly.
If the winch doesn’t operate, check the wiring connections. Look for any loose or incorrectly connected wires. Tighten and secure all connections before testing again.
Testing the winch system is essential for safe operation. Follow these steps to ensure your ATV winch is ready for use.
Troubleshooting Common Issues
Wiring a winch switch on an ATV can sometimes lead to problems. Troubleshooting these issues is crucial to ensure your ATV operates smoothly. The following sections will guide you through common problems and their solutions.
Switch Not Responding
If your winch switch is not responding, there could be several reasons. First, check the wiring connections. Loose or corroded wires can prevent the switch from working. Tighten any loose connections and clean any corrosion.
Next, inspect the fuse. A blown fuse can cause the switch to fail. Replace it with a new one if necessary. Also, verify the power supply. Ensure your ATV battery is charged and functioning well.
Lastly, consider the switch itself. Sometimes, the switch might be defective. Test it with a multimeter to see if it functions properly. If it doesn’t, you may need to replace the switch.
Winch Motor Issues
Winch motor problems can also arise. If the motor does not run, start by checking the power connections. Ensure all wires are connected firmly and there is no corrosion.
Inspect the solenoid. A faulty solenoid can prevent the motor from working. You can test the solenoid using a multimeter. If it’s defective, replace it immediately.
Another common issue is an overheated motor. Let the motor cool down and try again. If it still doesn’t work, the motor might be damaged. In such cases, consult a professional for repair or replacement.
Remember, regular maintenance can prevent many of these issues. Keep your ATV and winch in good condition for optimal performance.
Credit: www.etrailer.com
Maintenance Tips
Maintaining your ATV winch switch ensures it works efficiently and lasts longer. Regular upkeep can prevent costly repairs. Here are some essential maintenance tips to keep your winch switch in top shape.
Regular Inspections
Regularly check the winch switch for signs of wear or damage. Look for loose connections or frayed wires. Ensure the switch operates smoothly without any sticking. Inspect the mounting hardware to confirm it’s secure. Regular inspections can catch small issues before they become big problems.
Cleaning And Lubricating
Keep the winch switch clean to prevent dirt buildup. Use a soft brush or cloth to remove debris. Avoid using water directly on the switch. Instead, use a damp cloth for cleaning. After cleaning, lubricate the switch mechanism with a light oil. This helps maintain smooth operation and prevents rust.
Frequently Asked Questions
How Do You Wire A Winch Switch On An Atv?
To wire a winch switch on an ATV, connect the switch to the winch solenoid. Follow the wiring diagram provided. Ensure all connections are secure. Test the switch to ensure proper functionality.
What Tools Are Needed To Wire A Winch Switch?
You’ll need a wrench, wire strippers, electrical tape, and a wiring diagram. These tools help ensure a proper installation.
Can I Wire A Winch Switch Myself?
Yes, you can wire a winch switch yourself. Follow the manufacturer’s instructions and use the correct tools. If unsure, consult a professional.
How Long Does It Take To Wire A Winch Switch?
Wiring a winch switch typically takes around one to two hours. This depends on your experience and the ATV model.
Conclusion
Wiring a winch switch on your ATV is straightforward with these steps. Always ensure safety first. Use quality tools and follow the instructions carefully. Test your connections before finalizing the setup. This ensures everything works properly. With the right approach, you can easily enjoy your winch.
Now, get your ATV ready for any adventure. Happy riding!

